rpadao09

Posts : 274
Join date : 2009-06-22
Age : 33
Location : NPA
 |  Subject: Create a Realistic Weedy Text Effect in Photoshop Subject: Create a Realistic Weedy Text Effect in Photoshop  Tue Jun 23, 2009 10:33 pm Tue Jun 23, 2009 10:33 pm | |
|  
Step 1
Create a new document, size doesn’t really matter, I chose 800×400px. Choose a font (I used this font from dafont.com). Type some texts on the background layer and this should automatically form a new layer.
Position the text to the centre of the document:

Step 2
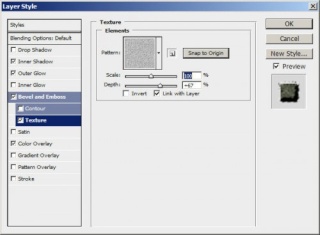
The text looks a bit flat to me so I thought I could make it look a bit more like a rocky ground. Apply the following layer blending options to the text layer:
Inner Shadow

Outer Glow

Bevel and Emboss

Texture

Color Overlay
 https://i.servimg.com/u/f69/13/29/14/55/7thpic10.jpg " border="0" alt=""/> https://i.servimg.com/u/f69/13/29/14/55/7thpic10.jpg " border="0" alt=""/>
The effect so far looks like:

Step 3
We can add some more texture onto the text. I found this bamboo image on the net it fits perfectly with the text. So please download that image, load it into Photoshop and select a portion of the image, copy and paste into our document. (You may have resize it a bit to fit the text)
See below for detailed position:

Name this layer as “texture”, hit Ctrl+M to bring up the Curve tool, apply the following settings:

Then hit Ctrl+L to bring up the Level Adjustment Tool. Firstly select the Green Channel from the drop down menu and apply the following settings:

Then select the RGB channel and apply the following settings:

Then change the layer blending option of this layer to “Soft Light” by right-clicking this layer and choose “Blending options”.
Here is the effect so far:

Step 4
Duplicate the “texture” layer once, then go to Filter > Other > Maximum (See below for detailed path)

Apply the following Maximum setting to the duplicated layer:

Here is the effect so far:

Step 5
Duplicate the “texture” layer once more and put the duplicated layer on top of every other layer, go to filter > blur > gaussian blur and apply the following settings:

We can add some more dusty-noise on the text to make it more realistic. To do this, duplicated the “texture” layer once more, put the duplicated layer on top of all layers, then go to filter > noise > add noise and apply the following settings:

Here is the effect so far:

That’s it for this tuorial! The rest is left upon your own creativity!
Here is my final image for this tutorial: (I added some background texture and adjusted the colour saturation of the texture layer a bit)

Hope you enjoy this tutorial and as usual, if you have any question, just drop me a line below!
| |
|


